#180 Roast Beef

It was Charlotte’s birthday last Sunday, so she got to choose a birthday meal. She chose well – in fact she chose the most British meal you could possibly imagine – Roast Beef and Yorkshire pudding. We British love our roast beef, and were very good at cooking it; the French called us rosbif, not to be rude, but out of respect, as we had the roasting of meat down to a fine art. In fact French chefs would come to Britain to learn the art of roasting on the spit. These days of course, we used our conventional oven to roast our meat, so technically we are making baked beef, not roast beef.

Roasting beef (or any other meat, in fact) is not hard as long as three simple rules are followed: buy good quality beef that has been hung for at least 21 days, season it well (especially if you are crispy fat fan), and roast it from room temperature – don’t go straight from fridge to oven. I bought a rib of beef from my new favourite butcher – Axon’s of Didsbury. A six pound monster that came to £30 – you may think this is expensive, but you get what you pay for and is enough to provide for six or seven people. Also, I have been making good meals from the leftovers: beef and oyster mushrooms in oyster sauce (I picked the mushrooms myself whilst walking in the woods!) and an oriental beef and noodle soup. So in the end, it actually pays to spend a bit more, as you get more out of it. Lecture over.

For roast beef, Griggers suggests either rib or sirloin on the bone with undercut. You need at least 5 pounds in weight. The first thing to do is to season you meat well with salt and pepper the night before. Keep in the fridge overnight by all means, but make sure you remove it from the fridge in plenty of time for it to get to room temperature. Preheat the oven to 200°C. Weight the meat and calculate the cooking time: 15 minutes per pound for rare, add an extra 20 minutes at the end for medium-well done. The joint needs to be able to sit on a rack inside the roasting tray in the oven, but first place the tray on its own with enough beef dripping to cover the bottom for five minutes before adding the joint and rack. If you are making Yorkshire puddings, you could make them in the traditional way of pouring the mixture into the roasting tin, or pour batter into trays if you prefer. Either way put them in 40 minutes before the end of cooking. When the time is up, remove the beef (keep the Yorkshires in, if need be) and allow it to rest for at least 20 minutes before serving and slicing. Place on a serving dish surrounded by cut-up pieces of Yorkshire pudding.


Whilst the beef is cooking, make the gravy by frying a sliced onion in some beef dripping with a teaspoon of sugar until it turns a deep brown. Add half a pint of beef stock and simmer for at least 20 minutes. Season and serve, or if you like a smooth sauce, strain it. Serve with roast parsnips, roast potatoes and horseradish sauce, plus some seasonal green veg.

#180 Roast Beef. I cooked my beef rare because it shows off the quality and taste of good meat, and very good it was too. The outside fat was crispy, and the inside was pink, juicy and tender – proper melt-in-the-mouth stuff. I give it 8.5/10 – as far as beef goes it’s just excellent, but roast lamb in the winner when it comes to red meat.

#178 Duck with Mint

Attempting the poultry section in English Food has been a paltry effort by me, but I intend to address this, people. I thought I’d start with one of the two duck recipes. This one, where the duck is stewed with a shed-load of mint seemed right up my summery alley. It also has the added bonus of a sauce paloise, which is very similar to a sauce béarnaise (except tarragon is substituted for mint) and uses a hollandaise sauce as its base. Now proficient in hollandaise sauce making, I was eager.

Apparently the French think it is hilarious that we have mint with our lamb, when blinking Johnny Foreigner goes around eating sauce paloise here there and everywhere with their duck! Only joking Frenchies, I loves ya really!

To make this, season a large duck inside and out with salt and pepper before stuffing its cavity with a whole bunch of mint. Next, wrap the duck in a large napkin or double-wrapped muslin. Half fill a large pot with water and add a large quartered carrot, a large onion studded with three cloves and a stick of celery. Bring it to the boil and then place the duck in and leave it to simmer, covered, for 2 ½ hours. When cooked, remove the napkin and place on a serving plate surrouded by mint leaves.

Start making the sauce around half an hour before the cooking time is up: Into a small saucepan add a tablespoon of chopped shallot, two tablespoons of chopped mint, a tablespoon of chopped chervil, a sprig of thyme, a quarter of a bay leaf and four tablespoons each of dry white wine and white wine vinegar, plus a good seasoning of salt and pepper. Boil down this mixture, until it has reduced by two-thirds. Allow to cool. Now place the mixture in a bowl and beat in three large egg yolks. Place the bowl over a pan of simmering water and beat in six ounces of unsalted butter bit by little bit. Season with lemon juice and more salt and pepper if required. Finally, stir through some freshly chopped mint leaves. Pour into a salad boat.

FYI: Chervil is tricky herb to get hold of, so instead of using it you can use the small yellow leaves from the inside of a bunch of celery, they provide a very similar flavour.

#178 Duck with Mint. If you don’t like mint, this is not the recipe for you. However, I love mint and it was just the thing for a summertime Sunday dinner. The duck was tasty, though a little dry, but the rich and tart sauce married with it perfectly well. In fact, the sauce paloise was the star of the show. I think it would go very well with lamb or even fish. The Medieval look of the birs with all the mint leave in and around it, was quite impressive too. Overall, I think this deserves 7.5/10 (though the sauce would be 9/10+ if I was marking it separately).

#175 Shoulder of Lamb with Rice and Apricot Stuffing

A dish with a Middle Eastern or North African influence, it seems like a very tame version of a lamb tagine with its spices, nuts and dried fruit, that has been very Anglicised. These days, we don’t need our food tempered down to suit our bland tastes; we like our foreign foods to taste traditional. However, as always new foods get invented, reinvented or modified dependent upon the country you are in and it is certainly no bad thing (think, chicken tikka masala and spaghetti Bolognese). This is a simple recipe that is excellent for a Sunday roast in the summertime – it required very little attention as you can make the stuffing, stuff the lamb and bung it in the oven whilst you go out for a nice walk or sit in the sun.

Also: I bought the lamb from Axon’s of Didsbury, South Manchester – it was of very good quality indeed, as was the pork ribs and sausages we bought too. If you are ever in the area, make sure you visit. They make their own sausages and also butcher veal – very rare these days. The man was very friendly and even gave us some extra pork ribs free. I think they may be my new favourite butcher.

To begin with, you need to make the stuffing. Boil 8 ounces of long grain rice in salted water until cooked. Drain it and put it in a bowl. Mix in 4 ounces of dried apricots ( you may need to soak them first), 2 tablespoons of seedless raisins, 2 tablespoons of slivered almonds, half a teaspoon each of ground coriander, cinnamon and ground ginger, plus plenty of salt and black pepper.

Now get the lamb ready – you will need a boned unrolled shoulder of lamb. Lay it out, season it, and then stuff it with some of the rice mixture. The best way to do this is to put the stuffing where the bones used to be. Grigson says to sew up the pocket where the bones were, but I found that I didn’t need to. Roll up the shoulder and secure it well with two or three pieces of twine. Weigh the lamb and place it in a roasting tin and brush it with melted butter. Season it well. Roast at 190°C for 30 minutes per pound plus an extra twenty minutes. When cooked, remove from the roasting tin and let it rest on a serving dish. Put the tin over the hob and add the remainder of the rice stuffing. Turn it around in the juices and let it reheat. Spoon it around the lamb and serve. We had it with a green salad dressed with a simple vinaigrette.


#175 Shoulder of Lamb with Rice and Apricot Stuffing – 9/10. Although I slightly mocked the dumbing down of flavour for the English palette, I found this recipe brilliant – it was simple, yet there were massive returns. The lamb fat was crispy on the outside and the meat beautifully tender within and the rice gave a sweet-sour flavour that cut through the rich lamb very well. It’s very difficult to knock this – especially when you have bought it from such a reputable butcher as Axon’s.

#161 Boiled Salt Beef and Dumplings

After the reasonable success of the ham I cured, I was keen to try something else so I went for salt beef. You can of course just buy your beef already salted, but if you want to have a go at your own, follow this link. My friend Evelyn had also made a request for it a while back, and although beef and dumplings are in no way summery I thought I’d do it anyway.

Put your beef – silverside or brisket – in a large pot and pour in enough water to just cover it. Bring it slowly to a simmer – taste the water after 10 minutes, if it’s salty change the water and start again. Add 2 unpeeled onions that have been studded with four cloves each, a small piece of nutmeg, two blades of mace and a generous seasoning of black pepper. Once the beef is simmering turn it down to the lowest heat possible so that the tiniest amount of bubbling occurs. Now cover and leave to simmer – the time depends upon the weight of the meat, to calculate it use the same method as on this entry, but a 3 pound piece of beef will take 3 ½ hours in total.

Toward the end of the cooking time, make your dumpling mixture: sift 4 ounces of plain flour with a teaspoon of baking powder and a good pinch of salt into a bowl and stir in 2 ounces of shredded suet (i.e. packet suet). Add just enough water to make a slightly stick dough and with floured hands make little balls of the dough (about ten, I’d say). Add a little grated horseradish in their centres. Alternatively use a cube of fried bread or mix chopped parsley into the dough.

When the beef is cooked, remove it and let it rest. Add the dumplings and let them poach for 10-15 minutes.

Serve it with gravy made using some of the cooking liquor and glazed carrots, says Lady Griggers. I did peas too and some horseradish sauce.

#161 Boiled Salt Beef and Dumplings – 8/10. Really delicious and definitely the best of the cured meat thus far. The beef was flaky and pink with the saltiness perfectly balanced with the aromatic herbs, spices and sugars from the brine cure and stock. I’ve never bought salt beef, so I’ve nothing to compare it to, but I shall be definitely doing this one again, but perhaps during wintertime! The dumplings were okay – they could have been fluffier, however, they were cooking for longer than 10 minutes as I lost track of time getting everything else ready. Oopsey!

Sorry there’s no photo – I took one, but for some reason it’s no longer on my camera’s memory! Double oopsey!!

#156 Cheshire Pork and Apple Pie

I bought a nice new pie dish last week, so I thought I’d Christen it with a nice big pie for Sunday dinner. I decided upon this Cheshire Pork and Apple Pie because it needed to be pretty quick to do (no cooking of the filling beforehand) as I had to be in the lab in the morning. Plus there was a load of Cox’s Pippins in Unicorn in Chorlton – apparently the last of the stored apples from the previous autumn.

This is a very traditional pie – essentially meat stewed in liquid (in this case cider) under a pastry crust, and comes from Hannah Glasse. It is a little odd in that it has a double crust; I’d have no problems with it if it was cooked in a thick sauce. Surely the pastry lining the pie dish will just turn into a soggy mess? To pre-empt this, I used a previous trick of The Grigson – to place a baking sheet in the oven as it heats, so that when the dish is placed on it, the underside quickly cooks.

First of all make some shortcrust pastry using 10 ounces of plain flour and use two-thirds of it to line a 2 ½ pint capacity pie dish.

To make the filling you need to prepare your pork – you need 2 pounds of boned pork loin. Cut off the rind and trim away the fat with a sharp knife, then slice the loin and chop into chunks. Next peel, core and slice around 12 ounces of Cox’s orange pippins. Then mix 8 ounces of chopped onion together with 4 chopped rashers of cured, unsmoked bacon. Now layer the ingredients in the pie dish: half of the pork, then half of the apples, scatter them with some brown sugar and then sprinkle over half of the onion-bacon mixture. Season each layer with salt and pepper plus some grated nutmeg. Repeat with the remainder in the same fashion. Dot the top with around 2 ounces of butter and then pour on ¼ pint of dry cider. Cover with the remaining pastry sealing and glazing it with beaten egg. Make some fancy pastry decorations if you fancy. Bake for 20 minutes at 220°C, and then turn the oven down to 160°C for a further 45 minutes. Jane doesn’t indicate what to serve with it, but I went with mustard mash and some asparagus.

Check out the arts & crafts spectacular atop the pie!

Oink!

#156 Cheshire Pork and Apple Pie – after much deliberation on this one, I give it 5/10. I think it was pretty average – I wasn’t sure about the amount of liquid in the pie, which after my efforts to prevent it, still made the pastry soggy. I think, it could be easily improved, however by making a roux with the butter and some extra flour and using the cider to make a sauce. I think it would have made this okay effort into a very hearty one that would stick to your ribs, as we say in Yorkshire!

#151 To Cook Salt Pork or Hams: Part 1 – To Eat Hot

After a 5 day wait, the pork I had put in the brine tub was ready for cooking. Jane outlines three different ways to cook your salt pork or ham if you want to serve it hot, but they all start with the same process: simmering in water with stock vegetables.

The first thing to do is to rinse your joint and weight it on some scales. Place the joint in a heavy casserole or stockpot, cover it with cool water and let it come to a boil slowly. Let it simmer for 5 minutes and taste the water – if it’s too salty throw the water away and start again (though it was fine when I tasted mine). For hams up to 4 pounds (2 kilos), cook for 30 minutes to the pound (1 hour to the kilo) plus an extra 30 minutes. However, this can be reduced if the joint is slim. To improve the flavour of the ham, add some stock vegetables: carrot, onion, leek, turnip, that kind of thing. They also flavour the stock with which delicious soups can be made – like this one.

It now depends on how you want to serve your ham:
1. Simply boiled – easy-peasy! Serve it with whatever vegetables or salad you like.

2. Encased in pastry – yes, you heard correctly! Remove before the final hour; encase it in thick pastry, glaze with egg and bake in a moderate-hot oven for an hour.

3. Glaze it. This the one I went for. Remove the ham half an hour before the end of cooking and remove the skin. Criss-cross the fat with a sharp knife and stud the crosses with cloves. Then make a glaze:

Sorry about the shit picture – I’m sure I took a better one than this!

Mix together a tablespoon of French mustard, one of double cream and one of either brown sugar, marmalade or apricot jam (or anything else sweet you like), next mix in a teaspoon of ground cinnamon or cloves. Spread this mixture all over the fat. Place in a roasting tin, add a ladleful of the stock to the bottom to stop any glaze from catching if it falls, and bake for 30 minutes at 190°C. When done, remove and let it rest before carving.

To accompany it, make a sauce with the pan juices by boiling them up with some cream, white wine or fortified wine, depending on the glaze you used. I went for cream as I used dark brown sugar.

Serve with seasonal vegetables and glazed onions, Grigson says. However, she also says that glazed turnips go well too. So I made those, plus boiled potatoes and peas.

#151 – To Cook Salt Pork and Hams: Part 1 – To Eat Hot: 7/10. I really enjoyed this – the ham cure was beautifully seasoned and salty and the spiced sticky sugar glaze complimented it perfectly. It was a little dry though, but I have a feeling that I cooked a little too long in the stock though as it was a slim piece of meat. That said, it was still delicious and we all polished it off quick-smart. I think that with a bit of practise at this kind of thing, the scores will quickly creep up to the high 8s, 9s or 10s!

#150 How to Cure Meat in Brine

Well here we are – 150 recipes in. I didn’t realise I was at this milestone until yesterday – unfortunately it’s not some magnificent feast, in fact it’s really a recipe as such, and I can’t really give it a rating (at least not yet).

Jane Grigson has quite a few recipes that require salting and brining, so I thought I’d better start to get to grips with this completely ignored section of the book, by making roast ham from start to finish as the best way for me to get started, though I’ll discuss that in a separate post – this one is just concerned with brining generally.

I’ve been doing a bit of reading on the subject of brining and it seems a bit of a lost art – there’s not much information about the history of it or how to do your own curing by the method. Obviously it’s gone out of favour to some degree because it is a method of preservation first and foremost, and now with frozen and refrigerated meats on tap these days we don’t have to do such things. However, brining also lends good flavour – we all like good ham, gammon or salt beef – so you would think it popular (seeing as it’s easy too). The thing is that it is time-consuming, and we can all just pick some up ready brined or ready roasted meat, but one thing I read was that for many wet-cured meats, the wet-cure part of the process is missed out! These days they are cured with nitrating bacteria – nitrates help preserve things – resulting a lack of flavour. I’m certainly not insinuating that this method is ubiquitous, but I reckon most supermarkets (and many butchers) use it.

Brine contains three magic ingredients that help preserve meat: salt, sugar and saltpetre. The first two do so because they are in huge quantities in the brine, and can affect the normal osmotic pressures of cells – both animal and microbe. Salts and sugar enter the cells, and water rushes out in an attempt to equal the concentrations inside and outside of the cells. This results in the death of the microbes and the preservation of the meat. Saltpetre (or potassium nitrate) is antibacterial and also gives the meat a pleasing pink colour (it is what makes corned beef so pink, for example). Aside from these three ingredients there are several herbs and spices that improve the flavour of the meat.

FYI: In days of yore, saltpetre was produced by pouring stale urine to huge haystacks where it would drain and crystallise. Yum!!

To make the brine, start off by cleaning a tub or bucket with a close-fitting lid and a plate that will comfortably fit inside with soda crystals. I used a six litre Tupperware tub with a handle. Do not use a metal tub as it may react with the salt or saltpetre. Allow them to drip dry. Whilst you’re waiting for that, make the brine: To a large stockpot or similar add 5 pints of water, 12 ounces each of sea salt and brown sugar and an ounce of saltpetre. This is the basic mixture, but now you need some aromatics (all of which are optional): 1 level teaspoon of juniper berries, a small piece of grated nutmeg, a bay leaf, 3 sprigs of thyme, a level teaspoon of black peppercorns and 4 cloves, Grigson says, but anything you like in that goes with the meat you are brining. Bring to a rapid boil and skim off any scum should there be any. Allow to cool in the pot. Once cool, strain it into your cleaned tub. Place in the joint of meat and keep it submerged in the brine with the plate you washed earlier. Place in a cool cupboard or pantry – though don’t allow it to go below 4°C. The length of time it sits there now depends upon the type of meat and the reason you are brining it (see your recipe, or below, for guidelines). When it is done remove with some clean tongs.

The brine won’t last indefinitely – it may grow mould on it’s surface, which some people say just to skim off. The reason is; the amount of salt depletes every time you use it. For a corrective dose, boil 1 ¾ pints of water with 7 ounces each of salt and sugar and a heaped dessertspoon of juniper berries. Let it cool and add it to the skimmed brine. You could of course just make more from scratch.

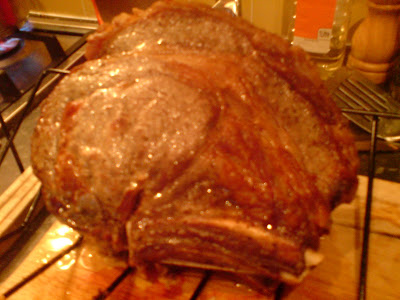
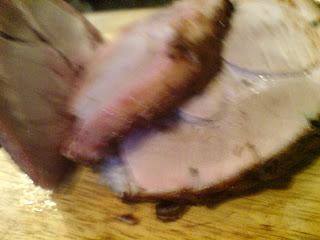
Pork leg joint magically being tranfomed into ham

Brining times:
To convert shoulder or leg of pork into ham, or for pork loin: 3 to 10 days
Pig trotters and halved heads: 24 hours
Small tongues (e.g. pig): 36-48 hours
Large tongues (e.g. ox): 5 days
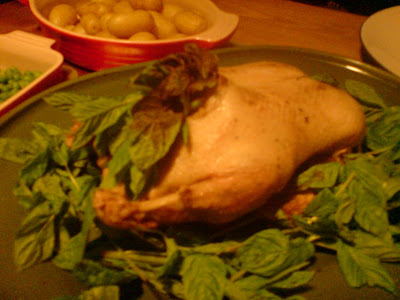
Duck (minus giblets): 36-48 hours
Beef silverside or brisket: 7-10 days
Lamb or mutton shoulder, leg and loin: 7-10 days.

The meat needs to be cooked by boiling – check the cooking water is not too salty after about 5 minutes cooking. If it is change the water and start again. If it’s okay, then add your stock vegetables or whatever the recipe requires.

However, if you are making a roast joint for Sunday lunch, try popping the joint in brine overnight to season it.

So there you have it – hopefully all works out and it doesn’t taste completely foul. My fingers are crossed that it ends up being worth the effort.

#148 Venison Sausages

Contrary to what you may think; I am not a big meat eater – I’m just not picky! However, I’ve been having a hankering for meat recently, not sure why. Anyways, at the butcher, I spotted some venison sausages that looked very fine indeed so I bought them. They turned out to be from Lyme Park not too far away from me in the Peak District, so the old food miles were happily reduced. Venison sausages are available pretty much anywhere, but a word of warning people – venison from supermarkets probably won’t be British. Supermarket venison usually comes from big deer farms in New Zealand. It’s not bad meat; it’s just flown a long way! Buy yours from your local butcher to get local venison.

This is what the Lady Grigson says to do with your venison sausages:

Fry them in lard or oil very quickly so that they develop nice dark stripes and arrange them closely in a shallow oven dish. Pour in enough red wine to come half-way up the sausages and season them. Bake in a hot oven – 200°C – for 15 minutes. Serve them with mashed potato and some seasonal greens – she says Brussels sprouts and chestnuts, but as it’s Maytime, I plumped for green beans. Pour a little of seasoned wine over the sausages if you like.


#148 Venison Sausages – 7/10. A great way to cook special sausages of any kind I reckon. I’m not giving an excellent score because the venison sausages were good, but not the best ones I’ve ever had. However, the red wine did improve the flavour a lot. The most important thing was that it scratched my red meat itch. The best thing about the whole thing was the fried mashed potato sandwiches I made the morning after. You must try it – fry patties of left-over mash in lard until a crispy crust develops, turn them over and put them in a buttie with brown sauce.

#147 Devilled Chicken Livers

A cheap treat. I love chicken livers, yet so many people seem to turn their noses up at them – I suppose it’s because it’s offal and folks are squeamish. It is silly though, since they are the main ingredient in pate. Any road, any local butcher should sell them very cheaply – I bought 250 grams for about £1.20 and they were prepared too, which reduced the amount of faffage later. If you buy them – do check they have had their bitter green fall bladders removed or the food will be ruined. This recipe appealed to me because of its simplicity, but also because of its ‘devilled’ (i.e., spiced) nature – a very Victorian way of cooking things (eggs and kidneys spring to mind). Devilling seems to be having a resurgence recently – the day after I cooked this, some chef on The Great British Menu competition that’s being shown on the BBC cooked devilled crab claws. Hopefully it will get popular again.

Have a go at this – it’s enough for 4 people as a starter.

Finely chop a medium-sized onion and fry it in 2 ounces of clarified butter gently. Whilst you wait for the onions to soften, chop up 8 ounces of chicken livers roughly, raise the heat and fry the livers quickly, do this for only 2 minutes, 3 at the most. This is why clarified butter is required – it doesn’t burn when you heat it as the ‘butter solids’ have been decantered off. I made my own by melting some butter gently, skimming off any scum from the top and decanting and solids away that had sunk to the bottom. Take the livers off the heat and add 2 teaspoons each of Worcester sauce and Dijon mustard, Cayenne pepper, 3 tablespoons of breadcrumbs, ¼ pint of whipping or double cream, and finally some salt and black pepper. Mix well and check your seasonings. If you like you devil a spicy one add more – I did! Divide between 3 or 4 ramekins and sprinkle with more breadcrumbs and melted butter. Bake at 190°C for 15 minutes and serve with toast.


#147 Devilled Chicken Livers – 9.5/10. I may change this to a 10/10 as it was a perfect starter. Absolutely delicious – the devil was fiery yet it was perfectly tempered with the cream and breadcrumbs. The big strong flavours had no chance of drowning out the rich creamy chicken livers. Brilliant stuff. I haven’t stopped thinking about since I made them, and my stomach is rumbling as I type. This is definitely a Grigson classic!

#143 Boiled Leg of Mutton (or Lamb) with (#144) Caper Sauce

When Jane Grigson wrote English Food in the 1970s, she complained – quite rightly – that the general quality of lamb in England had declined rather. This was mainly due to the importation of cheap New Zealand lamb, which rendered mutton almost obsolete. These days things have changed and British lamb in a staple even in supermarkets and mutton is having a well-deserved comeback.

I popped into Manchester City Centre at the weekend and, by chance, the monthly farmers’ market was on so I had a little browse around the stalls and bought myself a leg of lamb from Bowland in Lancashire – a farm that outdoor-rears lamb, beef and pork. Here’s their website. The man at the fruit and veg stall spotted my purchase and commented that the best meat he’d ever had was from there. Great stuff. Now all I had to do was decide what to do with it and went for the boiled leg of lamb with caper sauce – mainly because it requires very little effort, but also because it is a very Victorian way of cooking meat and wanted to try it.

It’s well worth mentioning that caper sauce is also traditionally served with fish too, so if you’re a piscitarian, or whatever you fair-weather vegetarians like to call yourselves, you can try it with salmon or skate.

The original recipe asked for either a leg of mutton or of lamb – if you are to use lamb as I did, get hold of a real free-range one, otherwise it won’t stand up to the boiling.

Trim the leg of any large amounts of fat if it hasn’t been already and place the leg in a large pot with enough water to cover it. Add stock vegetables – 3 quartered carrots, 2 quartered parsnips, one quartered turnip and three whole onions (all peeled) – plus a very good seasoning with salt and pepper. Bring to the boil and turn down to a very low simmer and leave for 2 to 2 ½ hours depending upon size. Don’t dare to throw the stock away – use it make the caper sauce and with the leftovers, a soup (I did lamb and mint soup).

Whilst it is cooking you need to make a turnip puree as an accompaniment – also traditionally Victorian. Peel and slice 3 pounds of turnips and boil them in salted water until tender. Puree them in a blender, return to the pan and then whisk an ounce of butter into them. Next mix ¼ pint of double cream with a level tablespoon of flour and whisk this into the sauce. Cook the sauce until it thickens up slightly.

When the meat is cooked, remove it from the water, place it on a serving dish flat-side down and make a paper ruff (yes, a paper ruff!) to fasten around the shank for decoration. Spoon the turnip puree around the outside and scatter the quartered carrots over the puree.

Loving the ruff!
Serve it with caper sauce that has been made using the stock from the lamb.

For the sauce melt ½ an ounce of butter in a small saucepan and stir in a tablespoon of flour. Cook and stir for a few seconds before adding ¾ pint of the lamb or mutton stock (or indeed fish) bit by bit to avoid getting lumps. Simmer until it is the thickness of single cream. Season with salt and pepper and add an egg yolk that has been beaten with 2 tablespoons of cream and stir for a minute or two. Lastly add a generous tablespoon of drained and rinsed capers and ½ a tablespoon of chopped parsley. Serve immediately, says Griggers.

Sorry about the shite picture!

FYI: If you are looking for an alternative to capers – the flower bud of an Asian shrub, you can try using the buds of nasturtium, buttercup or marigold. I’ll stick to the original, though I think.

#143 Boiled Leg of Mutton (or Lamb) with (#144) Caper Sauce – 7.5/10. I really enjoyed this meal. It was so easy to cook, you could not go wrong with it, even if you’ve never cooked anything before in your life. The lamb was tasty and moist and not fatty as most of it had dissolved into the stock – I’m definitely going back to Bowland for my meat. The turnip puree was rather odd – unsurprisingly, it was quite bland and I suppose they were the bland carb element. I would’ve preferred mashed potato though. It’s very hard to mark the caper sauce separately as it is part of the dish. I really liked it – it was piquant and married with the lamb perfectly. The only way it could have been improved would be to chop the capers up first so that the sauce was very capery indeed!