#224 Basic Bun Dough

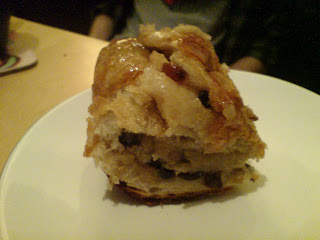
One of Griggers’ main bugbears in the 1970s was the massive decline in the quality of all things bready. There are of course artisan bakers that do make excellent bread – Barbakan in Chorlton, Manchester is the one near me – but generally it is the supermarket bread we seem to buy and endure. Of course, nowadays, supermarkets have in-store bakeries in supermarkets, so there are improvements, but it is still bread done in the cheap with additives. I think the point that Jane is getting at is we don’t know how good bread can be because we don’t bother to bake it ourselves. This is a shame, because artisan bread can be easily gotten hold of at a fraction of the price of a supermarket loaf, if you bake it yourself. I am trying my best at this concept and am getting better. This recipe is one that Griggers hails the most as it can be used as a base for hot cross buns and Chelsea buns; the supermarket ones are “dull” and this is because the ingredients that make them so good are omitted, such as sugar, eggs, butter and milk.

This recipe can be used as a base, but I wanted to see what the simple rich basic bread buns tasted like, partly through interest, but mainly because I wanted to do a practise one before I do the hot cross buns on the run up to Easter.

Begin by mixing together a pound of strong white bread flour with a quarter of a teaspoon of salt in a warmed mixing bowl. Measure out 2 ounces of caster sugar, and place one spoonful of the sugar into a pudding bowl along with an ounce of crumbled fresh yeast into a pudding bowl and four ounces of flour from the mixing bowl. In a jug, mix together a quarter of a pint each of milk and boiling water straight from the kettle. Whisk this into the yeast mix to form a smooth batter and leave to rise for around 15 minutes until the whole thing has become a satisfying yeasty cushion. Whilst you are waiting for it to rise, stir the remainder of the sugar into the flour and rub 3 ounces of butter into it. Make a well in the centre and pour in a lightly beaten egg and the foaming yeast mixture and mix together with a wooden spoon to form a dough. Turn the dough out onto a floured surface and knead for a good 10-15 minutes adding flour as you go so that the dough is slightly rubbery and “a moderately tacky, but not sticky, texture”. The mixing bowl should then be washed and greased so that the dough can sit inside and rise and double in bulk – make sure you cover it with some cling film or a damp tea towel. Fresh yeast rises much quicker than dried, so it’s great if you are an impatient bread-baker.


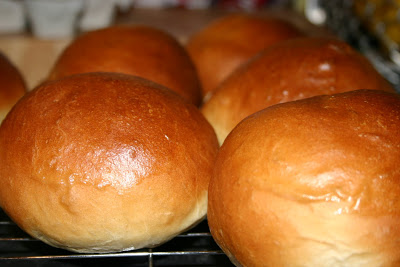
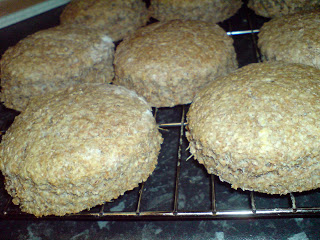
The bread can be used for whatever purpose you like, but if you want them au naturale, then roll the dough into a long sausage shape and divide into 12 pieces and form them into round buns. Place on a baking tray lined with baking paper, leaving gaps for when they rise. Cover them and prove for at least 30 minutes. Bake for 10-15 minutes at 230⁰C, remove and brush them with some milk to make them shiny when they cool.

#224 Basic Bun Dough. This bread was delicious! Slightly sweet, rich and very fluffy. I can’t wait to do the hot cross buns – they must be divine because these basic buns are a 7.5/10.

#217 Granary Bread with Walnuts

It’s been a while since I’ve done a bread recipe, and I’m definitely out of practise. I chose this one because it seemed suitably wintery, plus it used up flour that has been sat in the cupboard for a while now and I am trying to clear them, as I’ve mentioned previously. (As an aside, does anyone have a recipe that uses rice flour? It’s been sat there since that rubbish rice cake.) The main ingredient is granary flour, though I’m sure you could use wholewheat instead; I used a little stoneground flour left over from the Northumbrian Wholemeal Scones and Doris Grant’s Loaf from yonks ago. Grigson calls granary flour ‘Granary’ flour, because it’s a proprietary blend of malted flour and other nice things from one particular miller, though she doesn’t say who.

Don’t be put off by bread-making, Grigsoners, I really like doing it, and did start to get good at it, and even if it is a bit on the heavy-side, it will taste so much better than bought stuff. I think that it is the yeast flavour. Supermarket bakeries cannot compete – even with your worst effort!
Sift together a pound of ‘Granary’ flour, 4 ounces of strong white bread flour and 2 teaspoons of fine sea salt in the bowl of a food mixer. Add a packet of dried fast-action yeast (I reckon that’s about 2 level teaspoons) and mix well. Using the dough hook, stir in around ½ pint of warm water so that a soft, rough dough forms around the hook. Add two tablespoons of walnut oil and briefly knead, add more flour to make it smooth before placing in an oiled bowl. Cover with clingfilm and allow to ferment in a warm place until it has doubled in bulk. The time could be anywhere between an hour and several hours, depending on where you do this. As I don’t have an airing cupboard, I pop the bowl over the radiator. Knock back the dough (i.e. punch the air out of it) and knead in 4 ounces of roughly chopped walnuts. Now either place in an oiled loaf tin (or tins) or make it into a shape. I decided on a nice big round rustic loaf (i.e. the easiest). Use a very sharp knife and make some slashes on the top of the loaf and, bake in a very hot oven – 230⁰C – until cooked; this will depend upon the shape and size of your loaf, mine took 25 minutes. The way to tell is to tap the bottom – if it sounds hollow, it is done. Cool on a wire rack and eat with cheese, a winter stew or warm with butter and honey, I reckon.


#217 Granary Bread with Walnuts. Definitely the best bread so far – dense and with a good crumb, but not heavy. The flavour of the walnuts and the oil come through well, but are relatively neutral so that it would go equally well with sweet or savoury food. It’s very easy to make, all you need is some patience. Great stuff – a really nice, country loaf that is a little different, yet very classically English. 7.5/10.

#117 Mrs Borthwick’s Yorkshire Teacakes

Been very busy with work and decorating folks, sorry for being a little slack of late. I have had the chance to do a couple of recipes – trying to do at least ten a month, but not sure if I’ll make it this February…

Being a Yorkshireman I thought I’d make these Yorkshire teacakes. The currant teacake reminds me of my Mum; she’s rather partial, though I didn’t really know that they were particularly Yorkshire, I glad they are. They’re a large sweetened teacake with mixed fruit in them and traditional way to eat them is to slice them crosswise and eat with butter and cheese, though I like them toasted with butter. Each to their own.

Now I’ve started to crack the art of yeast cookery, I’m enjoying bread-making and these are easy – the fruit and sugar hide a multitude of sins – and taste much better than bought stuff. Part of the reason behind this is the use of fresh yeast, which gives a much better flavour than the dried stuff, plus the bread rises much more rapidly I’ve noticed.

Oh, and Mrs Borthwick is some reader of one of Griggers’ columns and sent her this recipe. In case you were wondering.


Anyways, this makes eight large ones:

Sieve together 1 ¼ pounds of strong plain flour, 2 ounces of sugar and a pinch of salt into a big mixing bowl. Rub in an ounce of lard and stir in 3 ½ ounces total of currants and mixed peel (have the ratio according to your taste). Make a deep well in the centre of the flour and crumble in an ounce of fresh yeast and then grate plenty of nutmeg over the whole thing. Next, measure half a pint of room-temperature whole milk and add a quarter pint of boiling water to it. Pour the lot into the well. Do not worry that it looks a horrible mess, it is supposed to. Flick a little flour over the top, cover and leave to bubble in a warm place for 15-20 minutes, or whatever. Mix to form a dough, adding more flour if required, and knead for a few minutes. Divide the dough into eight pieces and knead each again, fold them inwards so they form little plump breadcakes. Put onto greased baking trays and allow to rise again for another 15 minutes. Bake at 220ºC for 30 minutes, turning them over in the final 5 minutes. When ready place on a wire rack and brush with milk to give them a shine.

#117 Mrs Borthwick’s Yorkshire Teacakes. 6.5/10. Really nice teacakes that require minimum effort for pretty good results, though I would add more currants than this recipe I think. I really loving the bread cookery – Hot Cross Buns are a-calling, me-thinks!

#104 Wiltshire Lardy Cake

I’ve heard of the lardy cake and once saw someone making one on telly. I remember thinking that it looked pretty marvellous. For those of you that have never heard of lardy cakes, they’re basically a sweet sticky bun, but instead of enriching it with butter, lard is used; it’s layered along with sugar and mixed fruit through white bread dough. These ingredients meld together to make a moist, sticky and very rich teatime treat. It is quite possibly the least healthy thing I’ve ever cooked, and Jane Grigson reckons it’s on the “skinny side”!


Start off by making some bread dough using a pound of flour (follow this method if you don’t have your own recipe, but adjust amounts accordingly). Whilst you’re waiting for it to rise, measure out 6 ounces of lard and chop it up, 6 ounces of mixed dried fruit, 2 ounces of mixed peel and 6 ounces of granulated sugar. Once the dough had risen, and you’ve knocked it back, roll it out into a long oblong and spread the first two thirds of it with a third of the lard, fruit, peel and sugar. Fold this into thirds and press or tuck the ends under, give it quarter turn and roll out the dough again. Repeat this process two more times so that all the fruit and sugar are used up. Place the rolled up dough in a large tin that is oblong or square in shape and let the dough prove. Bake for 35-45 minutes at 220ºC. Turn it out onto a plate so that the sticky side is facing up and so that the lard can soak through the bread. Serve warm or cold.

#104 Wiltshire Lardy Cake – difficult to score this one; we tried it warm and it’s either 9/10 or 2/10. It’s tastes really sweet and is beautifully sticky with lovely plump juicy raisins, but has the bizarre savoury meatiness of the lard. I think if I were to cook it again, it would have to be even more skinny than Griggers’ measurements. However, once it was cool, it did taste less, er, meaty. Give it a go – easy and cheap to make, so I think I’ll go with a final score of 7/10.

#81 Northumbrian Wholemeal Scones

Another venture into yeast cookery. This one uses fresh yeast; a new one on me. It’s much better than the dried stuff. Also, I have a giant bag of stone-ground flour left over from Doris Grant’s Loaf the other month, and what with the credit crunch and the whole of the Western World going into liquidisation, it’s best I try to be a bit frugal. Also, I have finished the no carb diet I was on, and so the other reason I went for this recipe is that it uses proper organic brown flour with all the bits and wheatgerm and everything inside, and that must be better than white bread. In fact, my house is a white carb-free zone from now on (unless it’s in a recipe for the blog, natch). Oh, I bought the yeast from the Barbakan deli in Chorlton – an excellent bakery, probably the best in Manchester – for only 20p per 100 grams. I thought I may as well use what the best use. I hear that supermarkets with bakeries within will give you it for free.

I have no idea what make these scones particularly Northumbrian. Ideas anyone?


Here’s what to do…

Makes about 12 scones.

Mix 1 ½ pounds of stone-ground wholemeal flour with a teaspoon of salt, rub in 2 ounces of chilled lard (I used hands here rather than the mixer for a change) and make a well in the middle. Mix ¼ pint of milk with ¼ pint of boiling water and pour about a teacup full of it into dish or small bowl and stir in a tablespoon of golden syrup. Fork in an ounce of fresh yeast into the syrup mixture and allow it to froth up. This is much quicker than the dried stuff, it took only 10 minutes in my cold kitchen! Tip it into the flour along with the rest of the water-milk mixture. Be careful though, don’t add it all at once; you need a ‘soft but not sloppy dough’ says Griggers. I actually needed a little more. Put some clingfilm over the top of the bowl so it doesn’t dry out and let the Sacchromyces do its work until the dough as doubled in size. Roll out the dough, keeping it fairly thick, and cut out rounds with a scone cutter. Place scones on a baking tray, cover again and allow to prove. When they’ve risen again, brush them with milk and bake for 15-20 minutes at 220ºC.

#81 Northumbrian Wholemeal Scones – 7/10. Griggers suggests eating them hot with butter and honey. And so right she is. Bloody marvellous. They are just as good as normal scones. They’re not sweet, but a lovely malty flavour instead. I also had some the next day for a quick tea – split two and grilled them with cheese on. I’ve frozen the rest to keep me in a constant supply.

#78 Doris Grant’s Loaf

I was “working from home” the other day and therefore needed to procrastinate heavily; been making a poster for the Faculty of Life Science Research Symposium and though there’d be fewer distractions at home where there’s the internet, telly and the kitchen. I thought I’d have another stab at bread recipe and the last one was very nice, but I rushed it rather. Then I remembered Doris Grant’s Loaf – I had bought some stone-ground wholemeal flour specifically for the recipe, but had totally forgotten about it. I’m trying to get fit at the moment and so trying to cut down on white carbs, so this one was right up my street, plus Griggers says that as long as you can read and measure you can make this bread as it requires no kneading. I’m not too sure about that, but it is easy and certainly a welcome change.

Add 1 ½ level tablespoons of dried yeast to 1 ½ rounded teaspoons of dark Barbados sugar (you can use honey, but I like burnt liquorice taste you get off molasses) and whisk in 1 ½ tablespoons of blood-heat water in a small bowl. Leave yeast to active and foam, which takes 20-30 minutes. I found that placing the bowl in a larger one filled with warm water sped the whole process up. While that’s happening weight out 1 ½ pounds of stone-ground wholemeal flour into a large bowl and mix in a teaspoon of salt. If (like me) you don’t have somewhere warm like an airing-cupboard, but the flour in an over at the lowest temperature possible and let it warm through. When the yeast is ready, make a well in the flour and pour in the frothy mixture and slowly pour in one pint of blood-heat water, mixing thoroughly with your hands (no need for mixers, here!). The dough should be quite sticky, though you may find you don’t need all the water. Split the mixture between a large and a small loaf tin that have been greased and allow the dough to rise for about 45 minutes (I put it back in the still-warm oven). Bake for 40 minutes at 200°C.


FYI: Doris Grant was a very popular post-war cook and suggested this recipe as an alternative to the ‘national loaf’, which I can imagine flaccid and tasteless (though probably no way near as bad as our standard supermarket loaves these days).

#78 Doris Grant’s Loaf – 8/10. On my first slice, I thought I’d messed it up as it is not a light fluffy loaf, but quite heavy and mealy like soda bread. After another slice, I was hooked, and managed to eat most it to myself! Griggers suggests slicing it thinly with smoked salmon, but I’m not really a fan, so I had butter, farmhouse Cheddar and chilli jam. Go out and make this!!

#59 Electric Dough Hook Bread

Since as there’s about a million different bread recipes in this Goddam book, I thought I’d better have a crack at some bread-making; I’m also trying to write a paper at the minute and therefore needed a reason to procrastinate. I’ve made bread before but it’s always been a bit arduous and not worth it, since the end result resembles a washing-up sponge in both colour and texture. I thought I’d better start at the start and make a white loaf – (#59) Electric Dough Hook Bread is the piss-easy way to do it, apparently, and if you are wanting to supply your family with home-made bread every day, says, Jane, this is the way to do it:


Measure out 3/4 of a pint of warm water and put half in the bowl of your mixer along with 2 level tsp of dried yeast and 1 of sugar. To the remaining half, add 2 tsp of salt and 4 tbs of lard or oil – Jane says olive oil is the best thing, so that’s what I did. After about 20 minutes the yeast becomes all frothy as it activates and gets going. My kitchen was quite cool, so it would probably only take 10 in a warmer one, I reckon. The salty water was then added along with 1 1/2 pounds of white flour (though you could do a combination of wholemeal and white). Put the dough hook attachment onto your mixer and turn it on low and let the dough form around the hook. When it’s all come together, you can turn the speed up a little, but it only takes about 5 minutes in all – don’t overwork it says Jane, or else!! Next put some Clingfilm over the top of the bowl and wait for the dough to double in size. I have no airing cupboard, so to speed up the process I hugged the bowl and watched telly, allowing my body heat to increase the yeast metabolism.


When that’s done, knock-back the dough by punching it to let all the air out. Roll a pound of the dough into a thick sausage shape and put in a small loaf tin, and pout the rest in a large one. Cover with cling film again – brush it with oil to stop the dough sticking – and allow to prove, i.e. let the dough rise a second time, until it is over the sides of the tins. This takes ages if your kitchen is cool – but don’t worry it will eventually.

Bake at 230 degrees C for 30 minutes, then take the loaves out of their tins and turn them upside down, so the crusts can crisp up. Put the loaves back in the tine and brush the tops with milk to make them shiny. Cool them by laying then across the tins. Phew!


#59 Electric Dough Hook Bread – 8/10. It was a foolproof recipe and it tasted lovely – really (I know it sounds stupid) bready. The flavour of the yeast made it I think. It was quite dense, but I think that was my fault for not letting it prove for long enough. I had a piece still warm with butter on, which I think is the best way to have home-made bread. You certainly don’t need to bother with fillings when bread is this tasty. If only I have time to make for myself every day!