#239 Rice Bread

Baking is the best form of procrastination because at least you have something to show for it other than a lack of what you should have been doing. I chose this bread simply because I had all the ingredients in. Although it is a rice-based bread, don’t be getting it confused with the awful rice cake I made last year. This recipe is another from Elizabeth David’s tome English Bread and Yeast Cookery, and was very popular with one Lady Llanover who said rice bread is the best for sandwiches. It has gone out of favour since the nineteenth century, let see if it worth bringing back…

First cook three ounces of long-grain rice in double its volume of water in a covered pan. Let it simmer and don’t take the lid off until all the water has been absorbed. Meanwhile, cream half an ounce of fresh yeast in a little water. The recipe calls for quite a lot of salt: between a half and three-quarters of an ounce of it! I measured a shy half an ounce. Dissolve the salt in a quarter pint of water from the kettle and add to it a further 8 fluid ounces of cold water. Place 18 ounces of strong plain flour in a mixing bowl, make a well in the centre and add the creamed yeast and warm salty water. Mix to form a soft dough with your hands, adding more water of flour if appropriate. Cover and leave to rise in a warm place: you know the drill.


Knock back the risen dough and briefly knead, either by hand or with a dough hook, then place in a large greased bread tin that has a three to three-and-a-half pint capacity. Cover once more and allow to prove until it has risen up to the top of the tin. Place in an oven preheated to 230⁰C for 15 minutes and then lower the heat to 200⁰C for a further 15 minutes. Remove the loaf from the tin, invert it, and then place it back in the oven for a final five minutes so that the crust can crisp up.

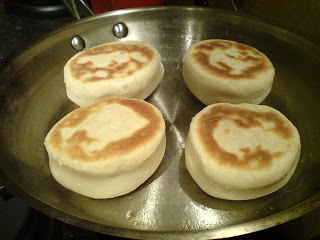
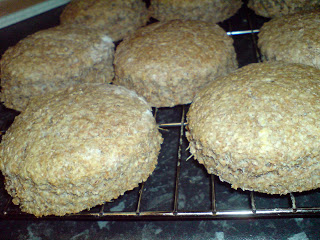
#239 Rice Bread. A lovely pale, fluffy and slightly spongy bread that was indeed great for sandwiches. I polished most of it off with fried bacon and rocket with mayonnaise. Definitely the best of the plain breads so far, and definitely one of the easiest. I wouldn’t put more than a quarter of an ounce of salt in though as any more and it could have been horrid. 8/10

#227 Wigs

Wigs go right back to the Middle Ages when a ‘wig’ meant a ‘wedge’. Bakers would make a sweetened cake using yeast as a raising agent, making cuts so that wedge shapes were made. This recipe is from Elizabeth David’s book, English Bread and Yeast Cookery – a classic work that I do not own yet! – and is a Seventeenth Century recipe. Eating sweet cakes really took off in that period of history as people realised that sweet cakes and breads went really nice with morning or afternoon tea. It was during this time that Teatime or High Tea came into being and a whole chapter of English Food is devoted to it. This is a good recipe to try if you’ve never made bread before as there is no kneading, er, needed!

To make your own wigs start off by creaming half an ounce of yeast in six fluid ounces of warmed milk. Beat in 12 ounces of plain flour (not strong white flour – this is more of a cake than a bread) to form a loose dough before mixing in four ounces of softened butter. Next, mix in 4 ounces of caster sugar and ½ teaspoon each of mixed spice and ground ginger along with two or three teaspoons of caraway seeds. Cover with cling film and allow to rise – a couple of hours should do it. Knock back the dough and divide it between two greased 9 inch sandwich tins, making four cuts (i.e. eight wedges). If the dough is too soft to pick up and handle, add some more flour. Cover the sandwich tins with large billowing polythene bags – you don’t want bag to touch dough – and let the wigs prove for 20 – 40 minutes. Bake in the oven for 15-20 minutes at 200⁰C. Eat warm.


#227 Wigs. I liked these – not too sweet, and great hot with plenty of butter on them. The genius thing was the addition of caraway seeds. The fragrant nutty taste may not be for everyone, but I really like it. It is a shame they have gone out of favour. These are definitely worth a go, particularly because they are a real little bit of English history. 6/10

#117 Mrs Borthwick’s Yorkshire Teacakes

Been very busy with work and decorating folks, sorry for being a little slack of late. I have had the chance to do a couple of recipes – trying to do at least ten a month, but not sure if I’ll make it this February…

Being a Yorkshireman I thought I’d make these Yorkshire teacakes. The currant teacake reminds me of my Mum; she’s rather partial, though I didn’t really know that they were particularly Yorkshire, I glad they are. They’re a large sweetened teacake with mixed fruit in them and traditional way to eat them is to slice them crosswise and eat with butter and cheese, though I like them toasted with butter. Each to their own.

Now I’ve started to crack the art of yeast cookery, I’m enjoying bread-making and these are easy – the fruit and sugar hide a multitude of sins – and taste much better than bought stuff. Part of the reason behind this is the use of fresh yeast, which gives a much better flavour than the dried stuff, plus the bread rises much more rapidly I’ve noticed.

Oh, and Mrs Borthwick is some reader of one of Griggers’ columns and sent her this recipe. In case you were wondering.


Anyways, this makes eight large ones:

Sieve together 1 ¼ pounds of strong plain flour, 2 ounces of sugar and a pinch of salt into a big mixing bowl. Rub in an ounce of lard and stir in 3 ½ ounces total of currants and mixed peel (have the ratio according to your taste). Make a deep well in the centre of the flour and crumble in an ounce of fresh yeast and then grate plenty of nutmeg over the whole thing. Next, measure half a pint of room-temperature whole milk and add a quarter pint of boiling water to it. Pour the lot into the well. Do not worry that it looks a horrible mess, it is supposed to. Flick a little flour over the top, cover and leave to bubble in a warm place for 15-20 minutes, or whatever. Mix to form a dough, adding more flour if required, and knead for a few minutes. Divide the dough into eight pieces and knead each again, fold them inwards so they form little plump breadcakes. Put onto greased baking trays and allow to rise again for another 15 minutes. Bake at 220ºC for 30 minutes, turning them over in the final 5 minutes. When ready place on a wire rack and brush with milk to give them a shine.

#117 Mrs Borthwick’s Yorkshire Teacakes. 6.5/10. Really nice teacakes that require minimum effort for pretty good results, though I would add more currants than this recipe I think. I really loving the bread cookery – Hot Cross Buns are a-calling, me-thinks!

#113 Muffins

After the reasonable success of the crumpets, I thought I should carry on the bread theme and use up some more of the yeast. I didn’t even have to look through; I knew straight away that I wanted muffins – the second best breakfast carb after the crumpet… Don’t be confused between these muffins and American muffins – they are two very different beasts. I suppose in America our muffins are called English muffins, non?

Muffins are halfway between crumpets and bread – they are made with soft dough using strong flour and are cooked gently on the hob, rather than in the oven. They’re easy to do, but do require a bit of time and energy to knead them properly… It is worth putting in a bit of effort as it make the dough nice and elastic and therefore fluffier when cooked.

This recipe makes 12 muffins:

Start off by creaming ½ an ounce of yeast in 4 tablespoons of warm water, then warm ½ pint of whole milk and an ounce of butter in a pan until they reach blood heat. Meanwhile crack an egg into a bowl and give it a brief whisk, and pour in the warm milk into it, whisking thoroughly.

Weigh out a pound of strong plain white flour and empty it into a warm bowl (or better, warm the flour and bowl together on a low heat in the oven). Make a well in the centre and pour in the yeast and the milk-egg mixture, along with a teaspoon of salt. Mix together thoroughly, adding more flour or water if required. You want a soft dough, but not one that is sticky. Knead the dough for 5 to 10 minutes, place it, cover it and allow the dough to rise to at least double it’s volume.

Roll out the dough to ½ inch thickness and cut out rounds with large pastry cutters or whatever (I used crumpet rings). Knead the trimmings together and roll them out too, so you get as many muffins as possible from the mixture. Let them rise a little.

Put a heavy-based pan on a low heat and brush it lightly with lard or oil and fry them gently. Griggers says they should expand into something like a “puffball fungus”, and if you leave them to rise slightly they will. Turn them over after around 7 minutes and cook the other side.


Apparently, you should toast muffins whole – they should never be cut, but torn, adding butters as you go. Either way, eat them with lots of salted butter.

#113 Muffins – 7/10. I really liked these – it was easy to make them nice and light as the low heat made them almost impossible to overcook. The result is light and fluffy muffins that eat very well, very hard to get wrong, I think, and you should give them a go. They freeze well too…

#110 Elizabeth David’s Crumpets

Charlotte and I have been very excited about the prospect of making our own crumpets for a while – just how do you get all the hole in!? We were to find out. The recipe is actually one by Elizabeth David – a very influential food writer, who wrote a book on yeast cookery. It’s making recipes like this – really stoically English fayre that I would never have thought of cooking myself. They are very easy – you need to buy some rings to cook them in as the batter is reasonably runny. If you don’t have one / can’t be arsed buying one, don’t worry, as you can ladle mixture straight into the pan and let it spread out to produce a pikelet which you don’t seem to be able to buy anywhere other than Yorkshire.


This recipe made us a baker’s dozen of crumpets:

Start off by warming a pound of plain flour through in the oven. Whilst your waiting for that warm up a pint of whole milk, 2 tablespoons of flavourless oil and a teaspoon of sugar to blood heat. Take out 3 tablespoons of the warmed milk and fork it through half an ounce of fresh yeast and let it thicken and become creamy. Make a well in the centre of the flour and add the yeast mixture, a tablespoon of salt and the remaining milk and beat the mixture – 5 minutes by hand, or about 3 with an electric beater. Cover the mixture and allow to rise and double in bulk – this is quite rapid with fresh yeast. Knock the mixture back and add ¼ pint of warmed water that has had a very generous pinch of bicarbonate of soda dissolved in it. Beat the mixture well and let it sit a rise again for around half an hour.


Grease a griddle or heavy-based frying pan and the crumpet rings with lard. Place the rings in the pan and pour in mixture two-thirds of the way up. Allow to fry very gently until the top is covered with holes and the surface is no longer liquid. Turn the crumpets over so they cook and colour on the other side. Allow them to cool and toast them, serving them with plenty of melted butter.

#110 Elizabeth David’s Crumpets – 6.5/10. The score I’ve given these crumpets may be changed later. The reason for this is that their consistency was rather soft and doughy, however they were piping hot throughout with no raw flour taste, so I’m not whether they are mean to be like that or whether they are undercooked. Consistency aside, they did taste absolutely delicious, so when I get the chance, I’m going to try them again…

#81 Northumbrian Wholemeal Scones

Another venture into yeast cookery. This one uses fresh yeast; a new one on me. It’s much better than the dried stuff. Also, I have a giant bag of stone-ground flour left over from Doris Grant’s Loaf the other month, and what with the credit crunch and the whole of the Western World going into liquidisation, it’s best I try to be a bit frugal. Also, I have finished the no carb diet I was on, and so the other reason I went for this recipe is that it uses proper organic brown flour with all the bits and wheatgerm and everything inside, and that must be better than white bread. In fact, my house is a white carb-free zone from now on (unless it’s in a recipe for the blog, natch). Oh, I bought the yeast from the Barbakan deli in Chorlton – an excellent bakery, probably the best in Manchester – for only 20p per 100 grams. I thought I may as well use what the best use. I hear that supermarkets with bakeries within will give you it for free.

I have no idea what make these scones particularly Northumbrian. Ideas anyone?


Here’s what to do…

Makes about 12 scones.

Mix 1 ½ pounds of stone-ground wholemeal flour with a teaspoon of salt, rub in 2 ounces of chilled lard (I used hands here rather than the mixer for a change) and make a well in the middle. Mix ¼ pint of milk with ¼ pint of boiling water and pour about a teacup full of it into dish or small bowl and stir in a tablespoon of golden syrup. Fork in an ounce of fresh yeast into the syrup mixture and allow it to froth up. This is much quicker than the dried stuff, it took only 10 minutes in my cold kitchen! Tip it into the flour along with the rest of the water-milk mixture. Be careful though, don’t add it all at once; you need a ‘soft but not sloppy dough’ says Griggers. I actually needed a little more. Put some clingfilm over the top of the bowl so it doesn’t dry out and let the Sacchromyces do its work until the dough as doubled in size. Roll out the dough, keeping it fairly thick, and cut out rounds with a scone cutter. Place scones on a baking tray, cover again and allow to prove. When they’ve risen again, brush them with milk and bake for 15-20 minutes at 220ºC.

#81 Northumbrian Wholemeal Scones – 7/10. Griggers suggests eating them hot with butter and honey. And so right she is. Bloody marvellous. They are just as good as normal scones. They’re not sweet, but a lovely malty flavour instead. I also had some the next day for a quick tea – split two and grilled them with cheese on. I’ve frozen the rest to keep me in a constant supply.

#59 Electric Dough Hook Bread

Since as there’s about a million different bread recipes in this Goddam book, I thought I’d better have a crack at some bread-making; I’m also trying to write a paper at the minute and therefore needed a reason to procrastinate. I’ve made bread before but it’s always been a bit arduous and not worth it, since the end result resembles a washing-up sponge in both colour and texture. I thought I’d better start at the start and make a white loaf – (#59) Electric Dough Hook Bread is the piss-easy way to do it, apparently, and if you are wanting to supply your family with home-made bread every day, says, Jane, this is the way to do it:


Measure out 3/4 of a pint of warm water and put half in the bowl of your mixer along with 2 level tsp of dried yeast and 1 of sugar. To the remaining half, add 2 tsp of salt and 4 tbs of lard or oil – Jane says olive oil is the best thing, so that’s what I did. After about 20 minutes the yeast becomes all frothy as it activates and gets going. My kitchen was quite cool, so it would probably only take 10 in a warmer one, I reckon. The salty water was then added along with 1 1/2 pounds of white flour (though you could do a combination of wholemeal and white). Put the dough hook attachment onto your mixer and turn it on low and let the dough form around the hook. When it’s all come together, you can turn the speed up a little, but it only takes about 5 minutes in all – don’t overwork it says Jane, or else!! Next put some Clingfilm over the top of the bowl and wait for the dough to double in size. I have no airing cupboard, so to speed up the process I hugged the bowl and watched telly, allowing my body heat to increase the yeast metabolism.


When that’s done, knock-back the dough by punching it to let all the air out. Roll a pound of the dough into a thick sausage shape and put in a small loaf tin, and pout the rest in a large one. Cover with cling film again – brush it with oil to stop the dough sticking – and allow to prove, i.e. let the dough rise a second time, until it is over the sides of the tins. This takes ages if your kitchen is cool – but don’t worry it will eventually.

Bake at 230 degrees C for 30 minutes, then take the loaves out of their tins and turn them upside down, so the crusts can crisp up. Put the loaves back in the tine and brush the tops with milk to make them shiny. Cool them by laying then across the tins. Phew!


#59 Electric Dough Hook Bread – 8/10. It was a foolproof recipe and it tasted lovely – really (I know it sounds stupid) bready. The flavour of the yeast made it I think. It was quite dense, but I think that was my fault for not letting it prove for long enough. I had a piece still warm with butter on, which I think is the best way to have home-made bread. You certainly don’t need to bother with fillings when bread is this tasty. If only I have time to make for myself every day!

#16 Palastine Soup

OK. Something with Jerusalem artichokes…
…(#16) Palestine soup. Brilliant. FYI Jerusalem artichokes have nothing to do with Jerusalem or artichokes. It was thought that they tasted similar to artichokes, but I don’t think they do. Jerusalem is a corruption of the word Girasole, which is the Italian for sunflower. (I used to grow them in the garden of my old house, and their flowers are like tiny sunflowers.) They are a much under used vegetable – at one point, before the domestication of the potato, it was attempted to make the Jerusalem artichoke a staple crop. It was considered too strong in flavour, and what a shame!

The soup was pretty easy; start by blanching a pound of Jerusalem artichokes in boiling salted water so that the knobbly skins can be peeled away. Place the peeled artichokes in the cooking water to prevent them discolouring. Meanwhile, gently cook 4 ounces of chopped onion, a crushed garlic clove and an ounce of chopped celery. When soft, add two rashers of streaky bacon and then after two minutes add the artichokes and 2 ½ pints of chicken stock. Simmer until the artichokes are tender then blitz. Finally stir in two ounces (!) of double cream and two tablespoons of chopped parsley. And then serve, under the strict Grigson rules, with croutons. It made a lovely soup – really brought out the earthy flavour of the Jerusalem artichokes. It’s the best Grigson soup so far. I made a veggie version for Greg too using veggie bacon (!) and vegetable stock. It tasted as good as mine.

Greg says:
Palestine soup – This is my fave recipe to date I think. I had the girl version which Neil made in a separate pan using veg stock instead of chicken stock and veggie bacon instead of real piggy which meant my soup went a litle bit pink due to the colouring and smelt more like bacon than the real stuff! It was clearly the better of the two though possibly not admissbale under the strict Grigson regime. Anyways, the smoky bacony flavour together with the cream and that very specific Jersualem artichoke flavour was honestly amazing, if I’d had it in a restauarnt I would have been supremely chuffed. The croutons were alright but I could live without em, the fresh parsley is garnish enough. Wonderful . 9/10.

#16 Palestine Soup – 8.5/10. A brilliant winter-warmer! It should be part of everyone’s repertoire!